ExplainerHub
If you are hosting multiple ExplainerDashboards it becomes convenient
to host them at a single place. This is made easy with ExplainerHub.
Possible use cases are:
Showcasing multiple models to compare and decide which one to put into production
Keeping ExplainerDashboards up and running for all models in production in a single place
You can initialize an ExplainerHub by passing in a list of ExplainerDashboards:
db1 = ExplainerDashboard(explainer1)
db2 = ExplainerDashboard(explainer2)
hub = ExplainerHub([db1, db2])
hub.run()
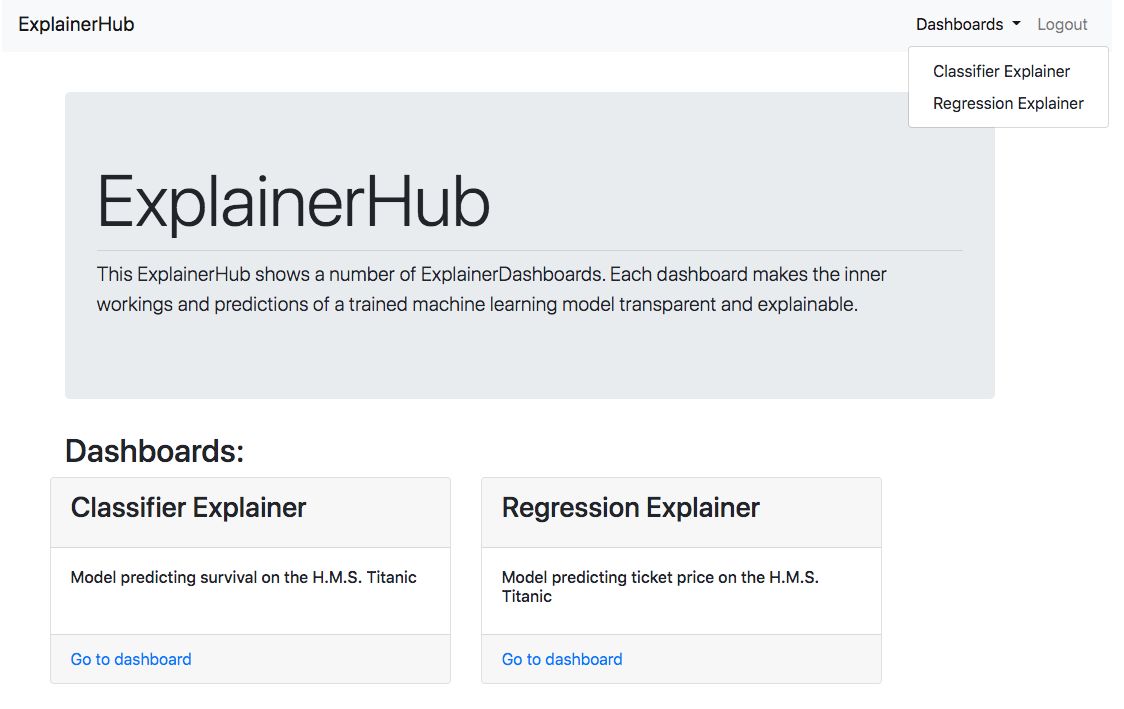
Each dashboard is hosted on it’s own url path (e.g. localhost:8050/dashboard1),
and a front end dashboard with links and descriptions for every dashboard is hosted
at e.g. localhost:8050:
Adjusting title and descriptions
You can adjust the title of the ExplainerHub and the description in the
jumbotron, by passing title and description. You can also adjust
the title and description of each ExplainerDashboard, and set the
url path with name:
db1 = ExplainerDashboard(explainer1, title="Model One", name="db1",
            description="This is model option one")
db2 = ExplainerDashboard(explainer2, title="Model Two", name="db2",
            description="This is model option two")
hub = ExplainerHub([db1, db2], title="Model Comparison",
            description="Showing dashboards for both model one and two")
hub.run()
Adding dashboards
You can add additional dashboards to a hub with:
hub.add_dashboard(db2)
And remove them by passing their name:
hub.remove_dashboard("db2")
Adding dashboards using url
You can even add dashboards to a running dashboard by navigating to the /add_dashboard
route and specifying the path to a .yaml file:
db2.to_yaml("dashboards/dashboard2.yaml", dump_explainer=True)
ExplainerHub([db1], add_dashboard_route=True).run()
If you then navigate to e.g. http://localhost:8050/add_dashboard/dashboards/dashboard2.yaml then
this dashboard will be added to the hub. By default you can specify any .yaml file
in any sub directory in which the hub is running.
This can be useful when you for example store explainers and dashboards as part of an MLOps or CI/CD flow.
If you store dashboards in a particular location, you can also specify a pattern to add dashboards:
ExplainerHub([db1],
        add_dashboard_route=True,
        add_dashboard_pattern="dashboards/{}.yaml").run()
Now you can simply nagivate to http://localhost:8050/add_dashboard/dashboard2 and it will
find dashboards/dashboard2.yaml and add it.
You can also remove dashboards by navigating to e.g. http://localhost:8050/remove_dashboard/db2.
Note
Dashboards will be added to a particular instance of the hub that is running. So if you have a deployment with multiple workers/nodes, this method will not work for now.
Changing size, theme, etc
By default the hub fills the entire width of the browser, you can make it more slim
by passing fluid=False. You can also pass other bootstrap themes:
bootstrap=dbc.themes.SKETCHY. You can adjust the size of the iFrame with
min_height=2000.
You can also build your own front end if you want. If you pass no_index=True,
the index page and navbars routes will not get loaded, while the dashboards are still
loaded on their respective routes. E.g.:
hub = ExplainerHub([db1, db2], no_index=True)
app = hub.flask_server()

@app.route("/")
def custom_index():
    return render_template("custom_index.html")
Managing users
You can manage logins and which usernames have access to particular dashboards
by passing logins and db_users. Here we create two users (user1
and user2) and only give user1 access to the first dashboard,
and only give user2 access to the second dashboard:
hub = ExplainerHub([db1, db2],
        logins=[['user1', 'password1'],['user2','password2']],
        db_users=dict(db1=['user1'], db2=['user2'])
If you had defined users in your ExplainerDashboard then these get automatically
carried over to the`` ExplainerHub``:
db1 = ExplainerDashboard(explainer1, logins=[['user1', 'password1']])
db2 = ExplainerDashboard(explainer2, logins=[['user2', 'password2']])
hub = ExplainerHub([db1, db2])
You can also add users from the hub itself:
hub.add_user("user3", "password3")
hub.add_user_to_dashboard("db2", "user3")
User/Password pairs can also be stored to file (with passwords hashed). The filename can be set
with the users_file parameter and defaults to users.yaml. When you
store a hub.to_yaml("hub.yaml") all logins will automatically be exported
to this file. This users_file can also be managed with explainerhub
CLI tool (see below).
By default, if you define any user logins, then the hub will only be accesible after
logging in. However you can also pass the parameter dbs_open_by_default=True,
in which case the hub index and any dashboards for which no db_users have
been defined will not force logins. Only dashboards for which you passed a list of
db_users will be password locked.
Storing to config
You can store an ExplainerHub to disk with ExplainerHub.to_yaml(). This
will also dump all the explainers to disk, store the configuration of dashboards
that make up the hub to individual .yaml files, and store logins to users.yaml.
You reload a hub with the from_config classmethod:
hub.to_yaml("hub.yaml")
hub2 = ExplainerHub.from_config("hub.yaml")
The hub.yaml file looks something like this:
explainerhub:
    title: ExplainerHub
    description: Showing dashboards for both model one and two
    masonry: false
    n_dashboard_cols: 3
    users_file: users.yaml
    db_users: null
    port: 8050
    kwargs: {}
    dashboards:
    - db1_dashboard.yaml
    - db2_dashboard.yaml
If you pass integrate_dashboard_yamls=True, then the configuration of the
dashboards get integrated into a single hub.yaml file instead of being
stored in separate files.
Storing to static html
You can store the hub front-end and the underlying dashboards to static html with e.g. hub.to_html(“hub.html”). This will also generate individual .html files for every dashboard e.g. dashboard1.html, dashboard2.html, etc, etc.
This might become a bit messy, so instead you can save straight to a zipfile with hub.to_zip(“hub.zip”).
explainerhub CLI
You can also use the explainerhub CLI tool to start your ExplainerHub
and manage your users straight from the commandline:
$ explainerhub run hub.yaml
$ explainerhub add-user
$ explainerhub delete-user
$ explainerhub add-dashboard-user
$ explainerhub delete-dashboard-user
SECRET_KEY
In order to make the user session (and so logins) persist when you reboot the server, you need to
pass a SECRET_KEY to the hub. Like with any Flask app you should be very
careful not to store this key somewhere easily findable. Ususally people store
it as an environmental variable:
$ export SECRET_KEY='5f352379324c22463451387a0aec5d2f'
Then you load it with the os module and pass it to the hub:
ExplainerHub([db1, db2], secret_key=os.environ.get("SECRET_KEY"))
If you do not pass a secret key, a random uuid key is generated each time you initialize the hub (which means you’ll have to log in every time).
- class explainerdashboard.dashboards.ExplainerHub(dashboards, title='ExplainerHub', description=None, masonry=False, n_dashboard_cols=3, users_file='users.yaml', user_json=None, logins=None, db_users=None, dbs_open_by_default=False, port=8050, min_height=3000, secret_key=None, no_index=False, bootstrap=None, fluid=True, base_route='dashboards', index_to_base_route=False, static_to_base_route=False, max_dashboards=None, add_dashboard_route=False, add_dashboard_pattern=None, **kwargs)
ExplainerHub is a way to host multiple dashboards in a single point, and manage access through adding user accounts.
Example
hub = ExplainerHub([db1, db2], logins=[['user', 'password']], secret_key="SECRET")hub.run()A frontend is hosted at e.g.
localhost:8050, with summaries and links to each individual dashboard. Each ExplainerDashboard is hosted on its own url path, so that you can also find it directly, e.g.:localhost:8050/dashboards/dashboard1andlocalhost:8050/dashboards/dashboard2.You can store the hub configuration, dashboard configurations, explainers and user database with a single command:
hub.to_yaml('hub.yaml').You can restore the hub with
hub2 = ExplainerHub.from_config('hub.yaml')You can start the hub from the command line using the
explainerhubCLI command:$ explainerhub run hub.yaml. You can also use the CLI to add and delete users.Note
Logins can be defined in multiple places: users.json, ExplainerHub.logins and ExplainerDashboard.logins for each dashboard in dashboards. When users with the same username are defined in multiple locations then passwords are looked up in the following order: hub.logins > dashboard.logins > user.json
Note
**kwargs will be forwarded to each dashboard in dashboards.
- Parameters
dashboards (List[ExplainerDashboard]) – list of ExplainerDashboard to include in ExplainerHub.
title (str, optional) – title to display. Defaults to “ExplainerHub”.
description (str, optional) – Short description of ExplainerHub. Defaults to default text.
masonry (bool, optional) – Lay out dashboard cards in fluid bootstrap masonry responsive style. Defaults to False.
n_dashboard_cols (int, optional) – If masonry is False, organize cards in rows and columns. Defaults to 3 columns.
users_file (Path, optional) – a .yaml or .json file used to store user and (hashed) password data. Defaults to ‘users.yaml’.
user_json (Path, optional) – Deprecated! A .json file used to store user and (hashed) password data. Defaults to ‘users.json’. Was replaced by users_file which can also be a more readable .yaml.
logins (List[List[str, str]], optional) – List of [‘login’, ‘password’] pairs, e.g. logins = [[‘user1’, ‘password1’], [‘user2’, ‘password2’]]
db_users (dict, optional) – dictionary limiting access to certain dashboards to a subset of users, e.g dict(dashboard1=[‘user1’, ‘user2’], dashboard2=[‘user3’]).
dbs_open_by_default (bool, optional) – Only force logins for dashboard with defined db_users. All other dashboards and index no login required. Default to False,
port (int, optional) – Port to run hub on. Defaults to 8050.
min_height (int, optional) – Defaults to 3000 pixels.
secret_key (str) – Flask secret key to pass to dashboard in order to persist logins. Defaults to a new random uuid string every time you start the dashboard. (i.e. no persistence) You should store the secret key somewhere save, e.g. in a environmental variable.
no_index (bool, optional) – do not add the “/” route and “dashboards/_dashboard1” etc routes, but only mount the dashboards on e.g. dashboards/dashboard1. This allows you to add your own custom front_end.
bootstrap (str, optional) – url with custom bootstrap css, e.g. bootstrap=dbc.themes.FLATLY. Defaults to static bootstrap css.
fluid (bool, optional) – Let the bootstrap container fill the entire width of the browser. Defaults to True.
base_route (str, optional) – Base route for dashboard : /<base_route>/dashboard1. Defaults to “dashboards”.
index_to_base_route (bool, optional) – Dispatches Hub to “/base_route/index” instead of the default “/” and “/index”. Useful when the host root is not reserved for the ExplainerHub
static_to_base_route (bool, optional) – Dispatches Hub to “/base_route/static” instead of the default “/static”. Useful when the host root is not reserved for the ExplainerHub
max_dashboards (int, optional) – Max number of dashboards in the hub. Defaults to None (for no limitation). If set and you add an additional dashboard, the first dashboard in self.dashboards will be deleted!
add_dashboard_route (bool, optional) – open a route /add_dashboard and /remove_dashboard If a user navigates to e.g. /add_dashboard/dashboards/dashboard4.yaml, the hub will check if there exists a folder dashboards which contains a dashboard4.yaml file. If so load this dashboard and add it to the hub. You can remove it with e.g. /remove_dashboard/dashboard4 Alternatively you can specify a path pattern with add_dashboard_pattern. Warning: this will only work if you run the hub on a single worker or node!
add_dashboard_pattern (str, optional) – a str pattern with curly brackets in the place of where the dashboard.yaml file can be found. So e.g. if you keep your dashboards in a subdirectory dashboards with a subdirectory for the dashboard name and each yaml file called dashboard.yaml, you could set this to “dashboards/{}/dashboard.yaml”, and then navigate to /add_dashboard/dashboard5 to add dashboards/dashboard5/dashboard.yaml.
**kwargs – all kwargs will be forwarded to the constructors of each dashboard in dashboards dashboards.
- classmethod from_config(config, **update_params)
Instantiate an ExplainerHub based on a config file.
- Parameters
config (Union[dict, str, Path]) – either a dict or a .yaml config file to load
update_params – additional kwargs to override stored settings.
- Returns
new instance of ExplainerHub according to the config.
- Return type
- to_yaml(filepath=None, dump_explainers=True, return_dict=False, integrate_dashboard_yamls=False, pickle_type='joblib')
Store ExplainerHub to configuration .yaml, store the users to users.json and dump the underlying dashboard .yamls and explainers.
If filepath is None, does not store yaml config to file, but simply return config yaml string.
If filepath provided and dump_explainers=True, then store all underlying explainers to disk.
- Parameters
filepath (Path, optional) – .yaml file filepath. Defaults to None.
dump_explainers (bool, optional) – Store the explainers to disk along with the .yaml file. Defaults to True.
return_dict (bool, optional) – Instead of returning or storing yaml return a configuration dictionary. Returns a single dict as if separate_dashboard_yamls=True. Defaults to False.
integrate_dashboard_yamls (bool, optional) – Do not generate an individual .yaml file for each dashboard, but integrate them in hub.yaml.
pickle_type ({'joblib', 'dill', 'pkl'}, optional) – Defaults to “joblib”. Alternatives are “dill” and “pkl”.
- Returns
{dict, yaml, None}
- add_user(username, password, add_to_users_file=False)
add a user with username and password.
- Parameters
username (str) – username
password (str) – password
add_to_users_file (bool, optional) – Add the user to the .yaml file defined in self.users_file instead of to self.logins. Defaults to False.
- add_user_to_dashboard(dashboard, username, add_to_users_file=False)
add a user to a specific dashboard. If
- Parameters
dashboard (str) – name of dashboard
username (str) – user to add to dashboard
add_to_users_file (bool, optional) – add the user to the .yaml or .json file defined in self.users_file instead of to self.db_users. Defaults to False.
- get_dashboard_users(dashboard)
return all users that have been approved to use a specific dashboard
- Parameters
dashboard (str) – dashboard
- Returns
List
- flask_server()
return the Flask server inside the class instance
- run(port=None, host='0.0.0.0', use_waitress=False, **kwargs)
start the ExplainerHub.
- Parameters
port (int, optional) – Override default port. Defaults to None.
host (str, optional) – host name to run dashboard. Defaults to ‘0.0.0.0’.
use_waitress (bool, optional) – Use the waitress python web server instead of the Flask development server. Defaults to False.
**kwargs – will be passed forward to either waitress.serve() or app.run()